Skillet Apple Pie: The Ultimate Guide to a Cozy Classic
Few desserts tug at the heartstrings the way homemade apple pie does, especially when baked in a cast-iron skillet. This skillet apple pie recipe blends old-fashioned charm with a streamlined process, offering crisp, caramelized edges, a luscious filling, and sweet nostalgia in every slice. Whether you’re seeking a rustic dessert for Sunday dinner or a simple way to wow guests, this apple pie delivers comfort and flavor on every level.
Why Skillet Apple Pie Wins Hearts
Apple pie is a mainstay for good reason, but baking it in a cast-iron skillet turns an everyday favorite into something extraordinary. If you’re new to this method, here’s why it works so well:
- Enhanced Caramelization: The cast iron pan gives the bottom crust a golden, toffee-like layer thanks to the melted butter and brown sugar.
- Simplified Assembly: Using store-bought pastry means less work, so you spend more time enjoying the pie, not rolling dough.
- Even Baking: Cast iron holds and distributes heat, ensuring the filling cooks evenly and the crust stays tender yet crisp.
- Homestyle Presentation: Serving directly from the skillet feels warm and inviting, perfect for family gatherings or casual get-togethers.
Essential Ingredients for Success
Every element of this recipe plays a role in the final result. Choose quality ingredients for the best pie.
| Ingredient | Function | Examples / Notes |
|---|---|---|
| Pie Crust | Holds filling, crisps up beautifully | Use refrigerated dough for ease; homemade works |
| Apples | Provide sweetness, tartness, and texture | Granny Smith, Braeburn, Honeycrisp or mixes |
| Butter | Creates caramel base, adds richness | Unsalted is best for control |
| Brown Sugar | Caramelizes under crust, sweetens filling | Dark or light both work |
| Granulated Sugar | Adds classic sweetness and balances fruit acidity | Adjust to taste, especially with tart apples |
| All-Purpose Flour | Thickens juices for a syrupy, non-runny filling | Cornstarch can substitute if needed |
| Ground Cinnamon | Lends warmth and classic apple pie flavor | Nutmeg, allspice, or cloves can be added as well |
| Egg | For brushing top crust, creates a golden finish | Optional but recommended |
Choosing the Right Apples
Texture and flavor are key with apples. Granny Smith apples are tart and hold up well, preventing a mushy filling. Braeburn adds a mellow sweetness, while Honeycrisp brings a crisp, juicy bite. Combining several varieties balances taste and texture. Avoid apples like Red Delicious, which tend to break down too much during baking.
Step-by-Step Guide: Baking Skillet Apple Pie
This pie comes together in simple steps. Here’s how to create the ultimate skillet apple pie from scratch:
1. Prepare the Caramel Base
- Place a 10-inch cast-iron skillet over medium heat.
- Melt 6 tablespoons of unsalted butter.
- Stir in ½ cup packed brown sugar. Let it bubble for a minute, stirring gently until smooth.
- Remove from heat and let it cool slightly.
Tip: This creates the signature gooey, caramelized bottom that sets skillet apple pie apart from traditional pies.
2. Prepare the Apples
- Peel, core, and slice 6 cups of apples into uniform pieces (about ¼ inch thick). You can use a mix of your favorites for balanced flavor.
- In a large bowl, toss apple slices with ½ cup granulated sugar, 2 tablespoons flour, and 1 teaspoon ground cinnamon.
Example: For more complex spice notes, add ¼ teaspoon freshly grated nutmeg or a pinch of ground cloves.
3. Assemble the Pie
- Lay one sheet of refrigerated pie dough over the butter and brown sugar mixture, gently pressing it to the skillet edges.
- Pile the apple filling evenly over the bottom crust, pressing down lightly.
- Cover with a second pie crust, tucking edges under as needed.
- Seal the edges by crimping with your fingers or a fork.
- Cut 4–6 small slits in the top crust to allow steam to escape.
- Brush with a beaten egg for glossy browning.
4. Bake
- Preheat your oven to 350°F (175°C).
- Place the skillet pie on the center rack.
- Bake for 60–70 minutes. The crust should be golden, and you’ll see bubbling caramel at the edges.
Tip: If the crust browns too quickly, shield with foil during the last 15 minutes.
5. Cool and Serve
- Remove from the oven and let the pie cool in the skillet for 15–20 minutes. This helps the juices set, making it easier to slice.
- Serve warm, scooping portions directly from the skillet.
Serving Suggestion: Pairs perfectly with vanilla ice cream or fresh whipped cream.
Expert Tips for Outstanding Results
A few extra steps can elevate your pie from great to unforgettable. Here’s what I always keep in mind:
- Keep Apples Consistent: Cut slices the same size so they cook uniformly. No one wants a mix of crunchy and mushy apples.
- Adjust Sugar: Taste your apples before mixing. Some are sweeter than others, so reduce or increase sugar to suit.
- Don’t Skip Venting: The slits on the pie crust help steam escape, keeping the crust crisp instead of soggy.
- Spice Variations: Add a pinch of allspice or cardamom for unique flavor. Citrus zest (like lemon or orange) brightens the filling.
- No Skillet? No Problem: An oven-safe baking dish works as a substitute, but the crust won’t caramelize as deeply.
- Egg Wash Finish: Brushing the top crust with egg gives a shiny, professional look and hints at the deliciousness inside.
Storage and Make-Ahead Advice
Skillet apple pie is best enjoyed fresh but keeps well for a few days.
Storing Leftovers
- Cool the pie completely before storing to avoid condensation and soggy crust.
- Cover the skillet tightly with foil, or transfer slices to an airtight container.
- Refrigerate for up to 4 days.
Freezing Unbaked Pie
- Assemble the pie but do not bake.
- Wrap tightly in plastic, then foil.
- Freeze for up to 2 months.
- When ready to bake, thaw in the fridge overnight. Bake as usual, adding an extra 5–10 minutes if needed.
Reheating
- To reheat the whole pie, cover loosely with foil and warm in a 350°F oven for 15–20 minutes.
- For single servings, microwave slices for 30–60 seconds.
Note: If using the skillet to reheat, let it come up to room temperature before placing it in the oven to prevent cracking.
Troubleshooting Common Questions
My crust shrinks while baking. What can I do?
Let the dough rest at room temperature for 10 minutes before assembling. Press gently into the skillet to help it hold shape.
The filling is too runny. Where did I go wrong?
Make sure to use the amount of flour listed. Overripe apples yield more liquid; you can add an extra tablespoon of flour if concerned.
Can I make this gluten-free?
Yes. Substitute gluten-free pie dough and swap all-purpose flour for a gluten-free blend or cornstarch.
Serving Suggestions and Variations
There’s room to personalize this classic. Here are a few ideas:
- Add Berries: Half a cup of blueberries or raspberries mixed in adds a pop of color and a hint of tartness.
- Salted Caramel Drizzle: Drizzle with store-bought or homemade caramel sauce before serving.
- Nut Topping: Toss a handful of chopped pecans or walnuts on the apple filling before sealing with the top crust for extra texture.
- Crumb Topping: Swap the top pie crust for a simple cinnamon-oat crumble instead.
Skillet apple pie is simple, inviting, and steeped in tradition. With its caramelized crust, gooey apple filling, and bold cinnamon aroma, it satisfies on multiple fronts—taste, scent, and that feeling of home. Next time you crave dessert that’s as rewarding to make as it is to eat, pull out your cast-iron skillet and let the simple magic unfold.
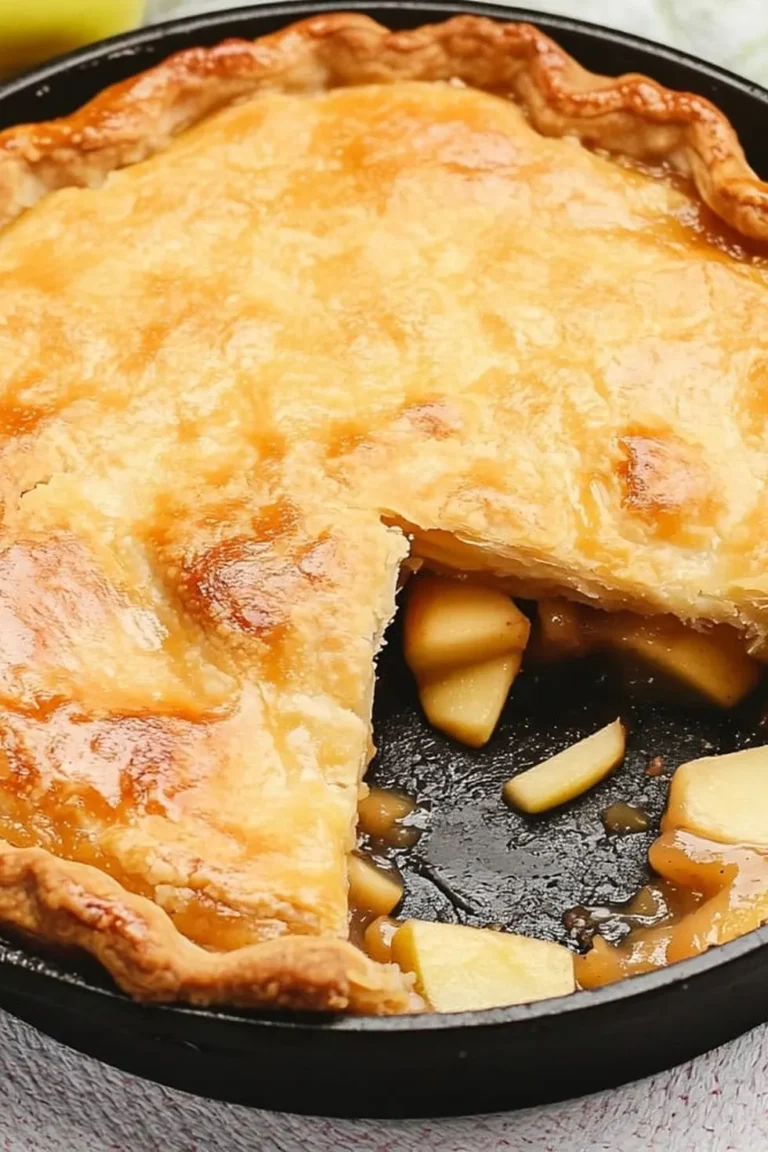
Skillet Apple Pie
Served warm with a scoop of vanilla ice cream. This iron skillet apple pie recipe features tender fruit and caramel. It’s a classic that’s sure to impress.
Ingredients
- 1/2 cup butter
- 2 teaspoons ground cinnamon
- 1/2 cup granulated sugar
- 1 egg, lightly beaten
- 1 (14.1 ounce) package refrigerated pie crusts (2 sheets)
- 4-5 pounds apples (see notes)
- 1 cup brown sugar, packed
- Coarse sugar, for garnish (optional)
- 1/4 cup all-purpose flour
Instructions
- In a 10-inch cast iron skillet, melt the butter and brown sugar over medium heat. Stir until the butter is melted and the sugar is dissolved. Remove from the heat and set aside to cool for 5-10 minutes.
- Preheat the oven to 350°F (175°C).
- Peel, core, and slice the apples into bite-sized chunks. Toss in a large bowl with the granulated sugar, flour, and cinnamon until well coated.
- Carefully place one of the pie crusts over the butter-brown sugar mixture in the skillet. Make sure not to press the crust down into the mixture.
- Pour the coated apples over the pastry and spread evenly. Then, layer the second sheet of pastry on top, covering them completely. Carefully press the edges of the two pastry sheets together to seal the crust. Cut a couple of slits in the top to allow steam to escape.
- Place the skillet onto a baking sheet to catch any drips and brush the top with the lightly beaten egg. Sprinkle the coarse sugar evenly over the top, if using.
- Bake for 60-70 minutes, or until the pastry is golden and the caramel is bubbling up the sides.
- Remove the skillet from the oven and let the pie cool for 15-20 minutes before serving. Enjoy!